Bun & Games – Bunny Heaven v1.06

BUNNY HEAVEN

Managed on Github

[Chrome Users: Webplayer support was recently removed from this browser. I am working to get a WebGL version for this project soon.]

[unity src=”935″]

There are two main controls: Movement (clicking or dragging) & Spacebark.

[You NEED Unity Webplayer to run this]

This image shows basic gameplay. Note the 60+ FPS & only 7 draw calls. Only one draw call is to display the bunnies.

This image shows ~500 animated bunnies. Note the 60+ FPS & only 7 draw calls. Only one draw call is to display the bunnies.

Let’s talk about Bunnies

About three weeks ago, I made a Bunny Heaven Dev Blog about a recent game jam project – Bunny Heaven.

It wasn’t much of a game. It had little interactivity. You could move a dog around chasing cute animated bunnies. The project’s merit is in how I misuse Unity’s default particle system to render 1000 adorable animated bunnies in one draw call.

Recently, work is renewing on this project! This blog post is a log of my thought process on how I utilize the particle system.

Bunny PArticles

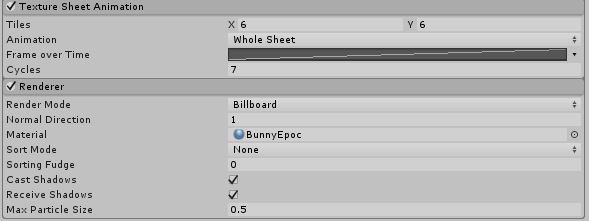
From the bottom of Unity's Particle System inspector view.

From the bottom of Unity’s Particle System inspector view. (This image is slightly out of date.)

Unity’s default particle system allows for some limited animation options. You are limited to one material and forward playing animation at a constant rate.

This would simply not do. I had a very particular purpose in mind. I wanted to display a great quantity of bunnies to the screen at once. The most effective way to do this was to avoid GPU bottle-necking myself. Particle Systems typically involve very few draw calls as they let a single shader draw all the various particles.

This was the beginning of Bunny Particles.

From there, the bunnies needed to animate and move in different directions. I accomplished this with a technique I’m calling Epoch Locking

Epoch Locking

According to Google, an epoch is

the beginning of a distinctive period in the history of someone or something

In this instance, an epoch is the moment a particle is locked into in order for it to display an appropriate animation.

This is the origin of my term, Epoch Locking.

How to Epoch Lock

  1. Unity’s particle system animates linearly (according to the curve I have set in the image above).
  2. Unity’s particle system allows manual editing of individual particles.
  3. Unity’s manual particle access allows you to change the age of a particle.
  4. A material sprite sheet can contain frames of bunny animation, even different directions.
  5. By checking the direction particles are moving you can access the most appropriate animation to use. You can save the direction an individual particle is moving in a CPU side array.
  6. Finally, you can manually set the age of that particle to the appropriate time interval to display the animation appropriate for it’s current velocity.
    • If the age drops out of that appropriate epoch, you reset it to the beginning of that time period.
    • If the age is too young, you can set it to the beginning of the epoch.

An early mistake I made with my approach was using an incorrect size for the sprite sheet. It is ideal if the sprite sheet is pixel perfect, meaning that the pixels line up with the pixels of the sprite.

Additionally, I recommend about nailing down the formula appropriate for your epoch period calculation.

You’ll need both the min age and the max age for each individual particle based on how many times the animation will cycle and how many frames you will cycle it through. If the starting lifetime of a particle is high, and the particle cycles through the full animation sheet (even though we never let it), the animation will be faster. You will have to do math in order to achieve your preferred animation speed.

Finally, my current code:

BunnyParticleEpochLocking

If you want more rigorous look at how to Epoch Lock, check out Github – Bunny Heaven.

Modified Animation Rates

There is an unmentioned sub-topic within Epoch Locking here. What if we want different bunnies to animate at different rates?

For example, a bunny is quickly running away from the dog. It should animate more quickly than a bunny that is idly hopping along.

To accomplish this we need to adjust the remaining lifetime of particles each frame. We can modify their lifetime based on the magnitude of their velocity. When a particle is moving quickly, it will age more quickly. Faster aging means faster animation.

BunnyParticleAgeAdjustment

Not Quite an Idle Game

Bunny Heaven’s design is moving in the direction of an idle game.

In the most recent development, I added a point counter that will accrue as the player interacts with the game. The game will have no lose state and allow the player to purchase different ways to interact with the game. However, these new modes of play won’t give exponentially greater points, they will just allow the player more ways to have fun.

This portion will change depending on feedback, but the goal is a no-stress environment where you can interact at your leisure.

Closing Words

The most rewarding part of working on this has been handing my phone to people for them to say “This is stupid” and then proceed to play for another 3 minutes after they felt it wasn’t worth their time.

Forrest has expressed interest in publishing an early version of the game on the Google Play Store. The game would most likely be free and shareable.


Thank you for reading,

If you have any thoughts or comments, feel free to reach out!
Unity WebPlayer Dead on Chrome: Moving Forward

Dear Unity Developers

If you did not know, the Unity WebPlayer plugin will no longer work by default for Chrome. Source

For better or worse, this change has happened and you can delve into why it happened elsewhere.

This post is about how you can get your content (portfolio pieces, projects, etc) back online.

This thread is about how you can get your portfolio pieces back and view-able on Chrome. If you’re old webplayers aren’t view-able on chrome, that can discourage people from testing your game or project out. We want to get that fixed.

RE-ENABLing NPAPI

It is possible to re-enable NPAPI (the old API that let the Unity Webplayer work on Chrome.)

You shouldn’t expect an end user to do this for obvious reasons: It requires your users to dig into hidden settings & enable things Chrome deliberately displays as dangerous and scary (because they are dangerous & scary.) Most users will immediately balk, leaving your content and possibly your webpage.

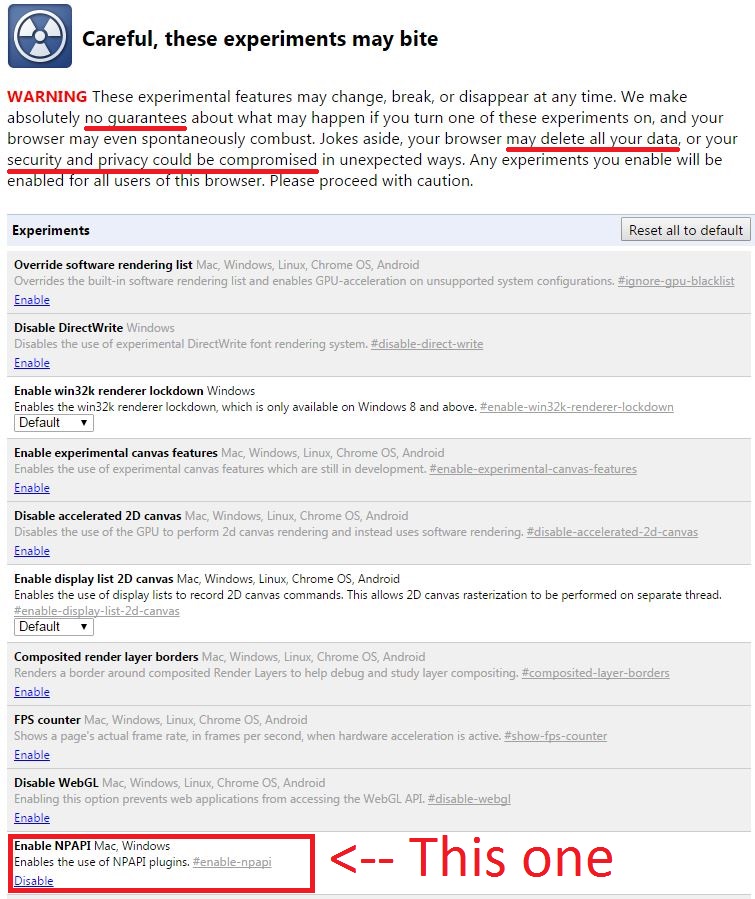
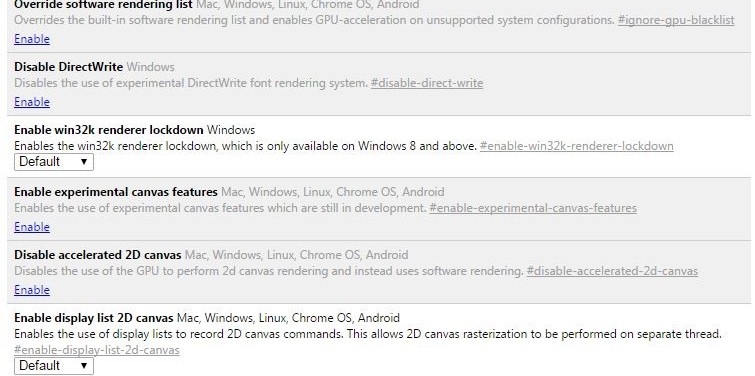
Take a look at the warnings at the top of the page where this option lies:

NPAPI

If you desire to re-enable this for your personal use, proceed as follows:

  1. Open Chrome
  2. Go to chrome://flags/
  3. Scroll & find ‘Enable NPAPI’

ZIP Distribution

A second plan of approach: a downloadable zip

This second option is still not ideal. Not everyone is willing to download a ZIP or RAR. Depending on the state of your website, chrome sometimes will go nuclear declaring malicious file warnings. You ultimately want to provide the path of least resistance to others if they are to test your game. Downloading takes time & trust that will dissuade some visitor.

To go about this approach:

  1. Set your Unity build settings to Mac or PC Standalone.
  2. Build your project.
  3. Zip your project up.
  4. Upload to Dropbox, Google Drive or distribute USBs by Carrier Pigeon.

WEBGL – The future?

A third option is to use Unity 5 & the new WebGL Preview build option.

In order to do this, you need to have Unity 5 installed. If you wish to continue using Unity 4 for development, you can maintain multiple installations of Unity on one computer. The downside is you will need to upgrade the project each time you want to build.

Upgrading Steps:

  1. Install Unity 5 (Unity Personal is free to most users)
  2. Backup your project or create a second project version.
  3. Upgrade your project to Unity 5.
  4. Pay attention to the upgrade progress for errors.
  5. Build to your previous project target
  6. Test your project.
  7. Fix any errors created from upgrading
  8. Prepare to build to the WebGL Preview target.

UPGRADE ISSUES

Upgrading older projects to Unity 5 comes with some small inconveniences in the form of upgrading errors or behavior changes.

I ran into several upgrading different projects but google turned up some easy answers. I’ll aim to keep this list updated with the non-project specific problems I find.

There might be some behavior changes within your project. Of the two projects I upgraded, I encountered some minor changes. Make sure to test your project!

BUILD SETTINGS

WebGLPreview

Once you get your project up and running with Unity 5, now comes the WebGL (Preview) steps.

  1. Select the ‘WebGL (Preview)’ option near the bottom of the Platform list.
  2. Click ‘Switch Platform’
  3. Click ‘Player Settings’ & confirm various typical settings
  4. Determine if you want a Development Build (read below)
  5. Determine what Optimization Level (read below)
  6. Click ‘Build’
  7. Select a target directory
  8. Click ‘Select Folder’
  9. Wait.
  10. Test your built WebGL version by opening the index.html in the target directory.
Development Build

If you plan on sharing your game, you don’t want to create a Development Build. It features non-minimized names & other inefficient approaches to allow for profiler use.

Optimization Level

Your choices here can be summed up like this:

The longer the build, the lower the file size and the lower the load times.

A small side project of mine (Cryomancer) went from 50MB to 30MB by going from Slow to Fast. (Disclaimer: I removed some unused audio, which Unity’s build pipeline should’ve stripped out anyway.)

I have yet to build Fastest (which apparently has the longest build times and should be done for final versions.)

User Faced File

If you’ve gotten this far, it means you have a built version or you’re waiting for it to finish.

I’ll take a moment to talk about the index.html. This index file can be modified and customized to contain things like game instructions, custom borders or even a link back to your website.

When you’re satisfied, hit build and pick a target directory!

You’ll get a different layout than the old WebPlayer html build page.

You will still have an ‘index.html’ that you can customize the contents for if you want to have stuff like game instructions, custom appearance or a link back to your website.

HOSTING

Finally, once you’re done you have a few options for hosting.

your webpage

You might be able to upload this straight to your website (maybe zip it locally, upload it and un-zip it there to speed things up).

This website is a custom wordpress install. I have yet to figure out how to directly embed WebGL Unity builds into posts or pages. If you know of a way or have advice, feel free to let me know.

DROPBOX

An alternative is hosting it on dropbox and providing a link on your webpage.

There is a great post on UnityAnswers that highlights how to do this.

An example link (which should be playable): Cryomancer WebGL on Dropbox

Finally, Facebook or other sites might put up warnings for this type of link, but that could be resolved as they get time to crawl the various pages.

Google Drive

For a Mini-Ludum a few months ago I managed to host a Unity Game on Dropbox. This was back in the days of WebPlayer, but it might be worth looking into.

If I get a chance to try this, I’ll update this post again.

CLOSING WORDS

I can’t speak for the WebGL build’s usability quite yet but it is online and I can link to it on my portfolio! I’ll aim to improve behaviors like full-screening, mouse locking & more in the coming weeks.

I hope that others find this useful.
If you have questions, comments or improvements to this process, feel free to reach out to me.

Random Platform Generation

This is the second post in a series about Ataraxy, a roguelike platform brawler. Here I will discuss some of the approach towards my Random floating island generation.


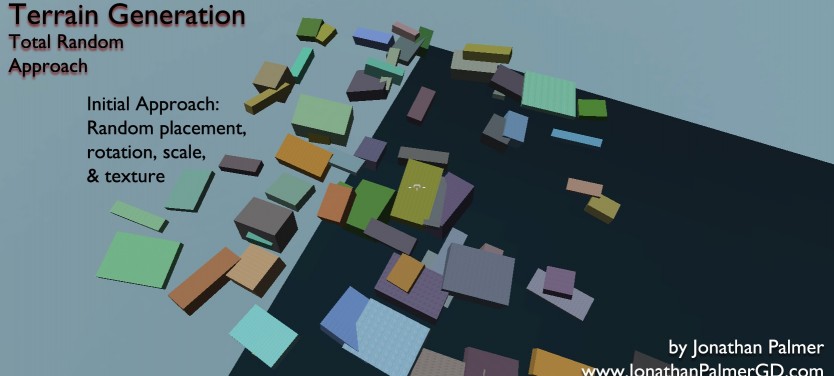
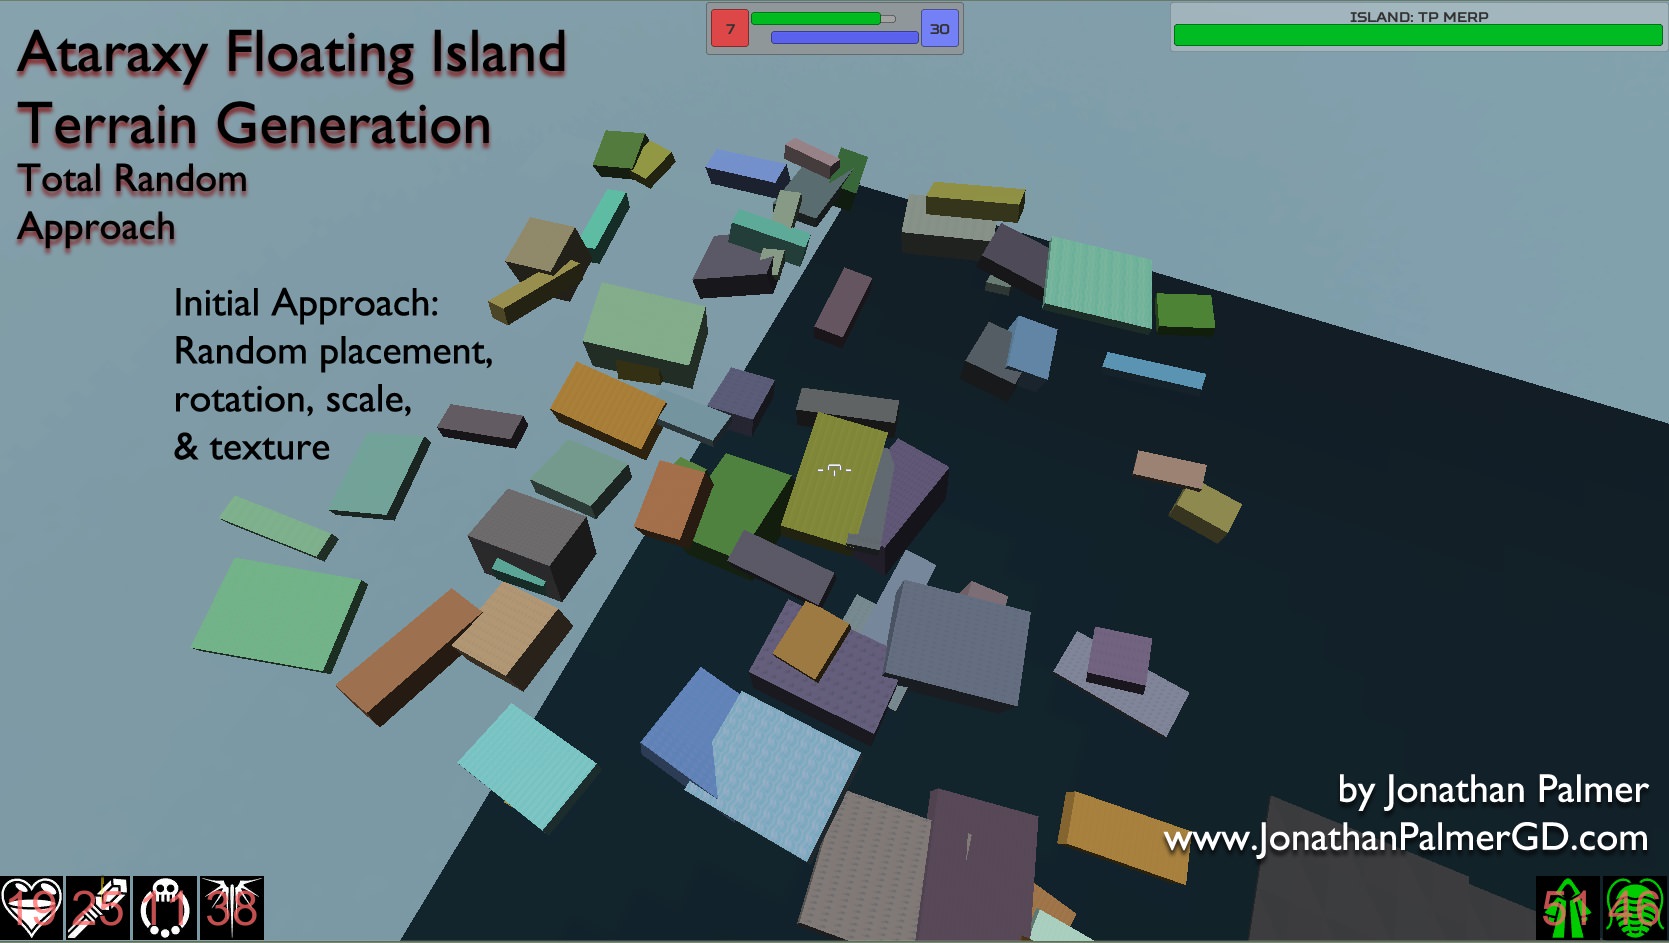
I started with the idea of island prefabs. I want to have variety in my islands later, so I wrote to randomly select an island prefab and then place, scale, tilt, and texture it. This was a sustainable long term approach.

Clusters – The world is made up of clusters which are located near each other. Each cluster is made up of N islands. Upon creation, a cluster instantiates islands in random orientations and positions into the world.

Other Notes

Cluster Attributes
The yellow, dark yellow and red lines are debug tools I use to evaluate parts of the cluster generation.

The yellow, dark yellow and red lines are debug tools I use to evaluate parts of the cluster generation.

As many of the characteristics of islands vary, a cluster’s parameters control the islands it creates. I found it beneficial to disable certain island initialization steps – texturing, scaling or rotation as it allowed individual clusters to feel distinct from one another. This is my first approach towards the idea of Biomes.

Later parameters such as island tilt ranges, island scale ranges and island perceived size for the Poisson Disk Sampling (smaller size means many islands overlapping one another) allow for greater variation between clusters.

This particular image showcases three different ranges in island generation. The top cluster has no random texturing or coloring, so the islands all maintain a bland template appearance. The other two islands are varied and colorful. Additionally, the top cluster islands are larger, less populated and further apart compared to the bottom two. (Last note: This image was added later after I got into the enemy path-finding components of terrain generation)

Upward ORientation

This is a pair of tips for randomly scaling and rotating the islands. In early runs, some of the scale ranges resulted in islands that appeared sideways in one dimension. This occurred when an islands X or Z scale was smaller than that island’s Y scale. While this isn’t a terrible flaw, I found it beneficial to always make the Y scale the smallest of the three, if X or Z was smaller, I simply swizzled the scales (totally an excuse to use the word swizzle).

The second tip was with the ranges of rotation I allowed. I didn’t want extreme tilting of the islands to where the CharacterController slid off of them, so I randomized the rotation between a min and maximum tilt (generally the same value). This parameter varies between clusters, so some clusters will be more tumultuous than others. As for the Y rotation, I allowed that to vary between 0 and 360, being as it didn’t matter which direction the island was facing.

March Edit: I have since disabled the random rotation of islands as it disrupts the way I can generate path nodes. I plan to re-enable random island tilting after I revise my approach to generating path nodes in a way that is not disrupted by Unity’s lackluster parent-child rotation.

Terrain Features

The environment needed to be adorned with various features to be more immersive and generate player interest. When encounter environments in nature, a meadow has an occasional tree or large rock. I wanted to place ruins, altars and checkpoints that would improve the environment as well as serve game-play purposes.

My initial approach was to give each island a small chance to spawn with a terrain feature from a group of features (checkpoints, altars with tokens, cosmetic details, etc.)

All of the objects on the platforms themselves are generated in the style of terrain features.

All of the objects on the platforms themselves are generated in the style of terrain features.

Some of the terrain features in this image: Early Wanderer (the white beaked, yellow pills with a black outline), token altar (bottom right with the yellow token), ruin (on the island north of the token), a light pillar (on the far back left light brown island).

Each terrain feature is placed on top of the island within the bounds of its edges. I evaluate the size of the terrain feature so that it wouldn’t hang off the edge of an island.

A downside came with terrain features, due to the way rotations are calculated in Unity between parent and child objects, it would skew my ability to place the features atop the island. For the time being I disabled the random rotation and will revisit it later.

While the current terrain features do not greatly improve the environment, they are a step in the right direction.

When I revisit and improve them, I seek to have different terrain features for different type of clusters and islands, creating the beginning of environmental biomes.

Melee Projectiles – the Solution to Hitscan

This is the first post in a series about Ataraxy, a roguelike platform brawler.

This content is the inspiration for creation of this series, so I will give some background on the project.

I had free time over Winter break between Graduate Semesters, so I decided to throw myself at a side project – a roguelike platform brawler.

The game world is made up of procedurally generated floating islands. You encounter enemies, gaining weapons and tools. You fight enemies that level up as you fight them, which creates natural pacing (Which I’ll no doubt discuss in a future post). Weapons fall into two general categories – ranged weapons and melee weapons. This is an in-depth description.

Common Approach to Melee weapons

A number of games (Team Fortress 2, Half Life) approach melee weapons by using hitscan – performing a single raycast or collision line forward. If this raycast hits an enemy, it deals damage or applies some other effect. This is usually the way games calculate instant velocity bullets. The difference between instant velocity bullet weapons and melee hitscan weapons is the latter usually has a short max distance before it stops checking.

This is not an ideal approach for a number of reasons. Consider a virtual axe, which has a shaft and a blade. If you were to swing the axe in TF2, you only have a boolean outcome for hitting or missing. This doesn’t allow you to consider if the player hit with the axe, the shaft or missed entirely.

I wanted a better approach than this.

I took a page out of Realm of the Mad God’s book. In that game, all of the enemies fire swaths of projectiles. Their implementation for melee weapons was a short-ranged projectile like a sword, dagger or club.

[embedyt]https://www.youtube.com/watch?v=9eIv1lk5Yzk[/embedyt]

Note the short range of this player’s attacks.

I mirrored this approach and I created a short-lived melee projectile, which I’ll call a slash.

I knew a slash would need a few points to render with. I have ‘firing points’ from around the player for different weapon starting positions – rocket launcher goes on the shoulder, machine gun goes at the waist, sword slashes are sideways, etc.

An in-game view of a sword slash. Simple but attractive when combined with a fade-out effect.

An in-game view of a sword slash. Simple but attractive when combined with a fade-out effect.

I created a box collider trigger volume (a standard way of handling  projectiles in Unity). I gave it a non-gravity affected rigidbody and a decent amount of drag so it wouldn’t travel very far.

Orienting the Collider

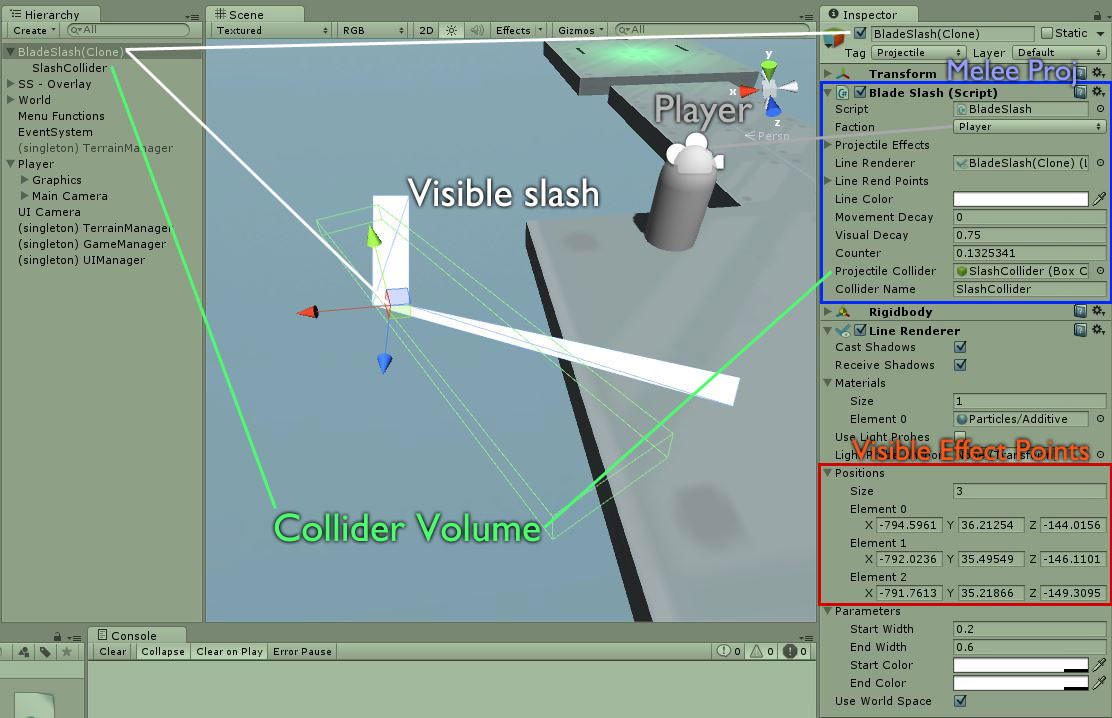
I oriented the box collider with the slash’s end points by using the two end points and the forward direction of the slash to find the up vector.

Within my Weapon base class, I have a method for setting up a melee projectile. It currently looks like this:

CODE: Setup Melee Projectile Parameters


This is set up so child weapons could replace this method if necessary. However, I made it generic enough that I haven’t had to replace it after implementing 4 different melee weapons. In order to use a weapon, you need to call the child’s UseWeapon function. This takes in target and fire point information. Each individual weapon’s version of UseWeapon handles differently and will until I can generalize further. Inside of the melee weapons, they configure the linePoints, lineWidth and specialVelocity if necessary while passing along certain information like the direction the projectile will move in.

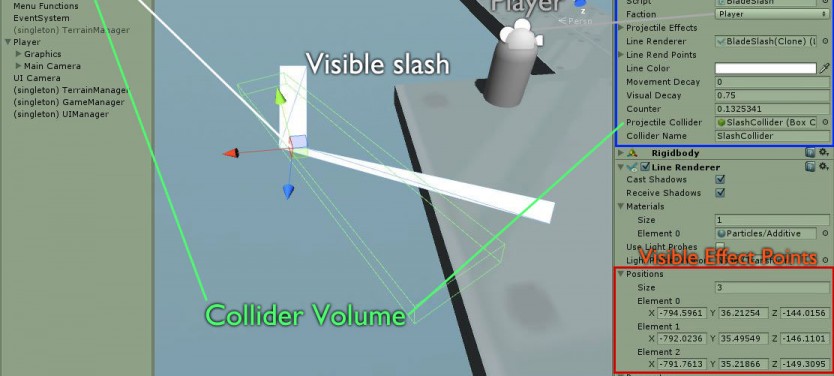
A view of the editor showing a capture blade slash. Note how the slash is tilted slightly, this is based upon the two end points.

A view of the editor showing a capture blade slash. Note how the slash is tilted slightly, this is based upon the two end points.

In order to orient the Collider upwards, first we take the cross product of the two ends of our weapon strike. This gives us the direction of what is perpendicular to our line.

We then use Unity’s transform.LookAt() method to rotate the collider to orient it in the direction we’re firing. We use the the perpendicular direction to state what the projectile should consider to be ‘Up’. This results in tilting the collider to match the tilt of the two end points.

There is a final call to a method for Adjusting the projectile’s collider position. This usually means slightly moving the collider forward or backward to match the particular weapon’s visual component.

What is even better about the use of a special method for orienting the collider is that it could be overloaded in subclass weapons without changing SetMeleeProjectile.

CODE: Excerpt from Weapon.cs


Lastly, I set the alpha on the slash’s line renderer to fade over time (which aligns with the destruction of the melee projectile)

Closing Words

Alternatives

There are a great number of ways to solve this issue.

A common enough approach is the idea of a continuous hitscan, performing multiple hitscan checks to determine how long the target is hit and in what regions.

Multiple mini-projectiles can be used to see if an enemy is hit by different phases of a sword swing.

A rotational multi-projectile could model the different ways an enemy could be hit by a swinging blade (with a lower damage handle and a grazing tip)

These different approaches are usually fairly expensive and require deeper implementations.

Pros and Cons

The result of my current solution is a single projectile instantiation, box collider trigger, tag checks, a bit of vector math for rotation and finally rigidbody calculations. This approach can even be improved to suit multiple projectile creation in a particular formation as well as shape changing projectiles.


Thank you for reading, happy implementing!