C# Strongly Typed Math

Background

Around a month ago, I got my hands on the XKCD What-If book. It is an excellent read (when I’m not chewing through Terry Pratchett).

It did prompt some math programming questions in my mind. These are things that Wolfram Alpha has likely solved ad infinitum. But I wanted to explore the challenge set a bit. So feel free to follow along on Github!

The Problem?

Units within Mathematics

When you conduct mathematics, you are dealing with three things:

  1. Quantities
  2. Units
  3. Equations

When programming, there is an extensive number of potential logic errors based around using the wrong units.

When you deal with an equation like F=MA (Force is equal to Mass times Acceleration).

Say you were trying to find Mass. You solve for M = F/A. But say you type the parameters in the wrong order.

You must now wait until you see the erroneous logic manifest through incorrect behavior. It might be subtle, or only arise in certain circumstance.

Sinking Floats

Float is one of the most common math variables you encounter. Distances are made up of floats. Vectors and Quaternions are several specialized floats.

Floats are highly flexible, but they offload aspects of the logic to the programmer.

A compiler is incredibly skilled at following arbitrary rules. Why not leverage the compiler to reduce or eliminate the entire class of logic errors.

A prototype Solution

It started with Distance. I thought about making an AbstractDistance class. Then I would create a class for each type of unit I hoped to use. I quickly realized I should make an AbstractUnit to wrap the float value at the center of it all.

Then I made my AbstractDistance. So functions could ask for an AbstractDistance, and you could provide any distance you had.

And then I made some child classes. Using C#’s abstract classes lets me force child objects to implement certain functions. You can take any AbstractDistance and call ToMeter() on it.

Each Distance class has a ‘raw-value’ constructor which takes a float and gives you a typed object.

Each AbstractDistance contains the unit conversion to each different data type. This becomes Pro #1 – avoid in-line conversions and Con #1 – need to implement each conversion.

Take a look at a test class for some of the distances.

And the results:

  • 74 Inches = 1.88 m, 6.17 ft, .00117 Mi.
  • 3 Meters = 118 in, 9.84 ft, .00186 Mi.
  • 238900 Miles = 3.84 * 10^8 m, 1.51 * 10 ^ 10 in, 1.26 * 10^9 ft.
  • 3 Feet = .914 m, 36 in, .000568 Mi.

Seems like the math checks out.

Giving Names a Clearer Voice

I did learn something as I made examples. With strongly typed Units, I no longer needed to convey units in the names (ThreeFeet could’ve been named something else).

This let the units speak clearly for WHAT they were. This let the name regain its ability to speak WHY they are. This is Pro #2.

Look at my variable of DistanceToTheMoon. It conveys that it stores that distance in Miles. You could easily create a variable [Inch DistanceToTheMoon] and another programmer would have no challenge understanding your intent.  The distance doesn’t change, you simply don’t interact as directly with the floats (which is where human error comes in)

Moving Onward – Velocity

After distance (and time) comes Velocity. Nothing too surprising here given other units we have created.

We expose a MovementDistance and a TimeInterval. Note how they are abstract, this means child Velocities can store a different variable in each field.

For instance, in MetersPerSecond’s constructor, it takes a distance (in Meters) and a time interval (in seconds). While we could take a reductionist approach to accepting just a float, we ask for a Meter unit and a Second unit. We also track these because 30 m/s isn’t quite the same as 10800 m/s (which is 30 m/s for an hour). In short, storing those units for later might be useful. This elegance is Pro #3.

A similar test to the DistanceTest. We’re starting to see an unfortunate amount of new() usage. It also crops up frequently in the ToMilesPerHour type functions. This is Con #3.

Accelerating in Complexity

So the next inevitable challenge was the second derivative of displacement with respect to time.

But how do we represent Second * Second? Surely we don’t want to make a SecondSqr unit. We’d have to make EVERY possible unit. Con #1‘s excessive initial implementation is already big enough. There has to be a better way.

What about Generics<T>?

The idea occurred to me. I could implement a Squared<T> generic. This would represent the unit is squared, allowing for easy conversion to and from the squared unit. You could provide functions for the square root, multiplying seconds together, etc.

Downside: What about Cubic? What about Inverse (raised to the negative first)? What about ^e?

Solution? Make it more generic!

I’ll step through this one a bit more slowly.

where T : AbstractUnit, new() where U : RaiseToPower, new(): These are C# constraints on what can be provided to this function. We only support ‘Pow’ing our AbstractUnits and raising them to a predefined Power, which the RaiseToPower class signifies.

T: Represents the unit we are raising to a power. So for Acceleration (m/s^2) T = Second

U: Represents the power you are raising the unit too. So U = Squared (instead of implementing a single generic, I made the concept of raising to powers generic.

public static Pow<T, U> New(T TVariable): This functions like our constructor (cause generics don’t play nice with constructors). You provide a BaseUnit which is being ‘Squared’. U is lightweight and has hardly any fields which you’ll see in a moment.

Overall, it isn’t that gruesome. I even added a function inside of Pow<T, U> which you can call to get a value of T (after it has been raised to the unit)

So what does the Use case look like?

This does speak fairly well about what is going on.

The word new does occur four times in this line (3 for generic new() constructors and once for our static Pow constructor-like), so another vote for Con #2 – overuse of new().

There is an additional problem under the hood. AbstractAcceleration wanted to have a Pow<AbstractTime, Squared> variable, which children could assign into, the same way AbstractVelocity has a AbstractTime variable. The downside is that you can’t assign a Generic<Bar> even if Bar : Foo and the variable is of type Generic<Foo>.

This means that when dealing with Pow<T, U>, you lose some of the expressiveness that AbstractVelocity sought to achieve. Whether this is back breaking, I don’t know yet. I’ll label it Con #3 – Wonky Pow Generic issues for now.

Final Example

As I move forward with this, I have implemented time, temperature, distance, velocity, several constants, exponents and more. I am moving towards force, pressure and eventually heat. I am interested to see how things continue to develop when I get to the Ideal Gas Laws.

As I was implementing towards AbstractForce, I realized I needed the concept of Area. So I thought about how I would implement this, would it be yet another class?

This was the result. While it is by no means perfect, it took only 1 line of code to implement this new functionality (adding an empty constructor to Meter, since AbstractUnit can’t enforce everyone has an empty constructor).

I think there are better forms of Area (Length x Width, Pi*r^2, etc) but this served my immediate purpose. This does fall into another vote for Con #3 – Wonky Pow generic usage.

I’ll go ahead and give Pow<T, U> Pro #4 for flexibility.

Pros

  1. Conversions exist in code. This avoids lots of off-the-cuff conversions or potential mistakes.
  2. Types are well defined. It allows the type to speak to what it is, and the name to speak to it’s purpose.
  3. Certain compound units are surprisingly elegant
  4. Generic Pow<T, U> is very flexible.

Cons

  1. Plenty of initial programming to implement everything
  2. Excessive use of new() operators when using ToOtherUnit() functions
  3. Acceleration and Area get really interesting but poainful with the Generic classes.

General Lessons

  1. You can achieve a lot with generics. However you can’t have a child pass Pow<Second, Squared> into a parent’s Pow<AbstractTime, Squared> variable. No implicit cast.
  2. Sometimes a good amount of up-front work can make your environment and code very expressive.
  3. Eliminating classes of errors is worth the experimentation.

Other Notes

There were a few things I didn’t bother to include. You can easily use operator overloading to support addition (not even of like units)

With a signature like [public static Milogram operator +(Milogram c1, AbstractMass c2)] you can call c2.ToMilogram() and directly add the values. This is pretty functional because it removes the concept of units from addition, and converts to whatever you have on the left side of the +/- sign. Say you screw up your unit target, you get a compiler error rather than a logic one.

To my understanding, I could achieve even stronger operator overloading in C++.

The concept of something being Unitless, or a ‘off-the-cuff’ unit like ‘Gazelles’ could be worth exploring. Have it be the fallback type when mathematics renders things as Unitless.

Future Considerations

The purpose of this experiment was to explore what it is like to eliminate a class of errors rather than solving them individually over time. It is very easy to fix bug after bug, but identifying the root of why they keep occurring is difficult. Preventing that entire category tends to be an additional level of challenge.

C# was the easiest tool to prototype these sorts of interactions but probably one of the long-term worst to keep at it. The code I wrote is not performant (all the new() usage) nor finished (the simple properties, the public variables, conversion duplication, etc)

C++ is a much more flexible tool for the way it handles operator overloading, certain aspects of generics and the concept of Phantom types. Phantom types allow you to achieve the strong types that I implemented in C# with less immediate effort.


If you didn’t see the link at the top, the code is available on Github (for Unity 5+)

Thanks for reading, hope you enjoyed this!


-Jonathan Palmer

Attunement Arena – Air Currents

Attunement’s Air Currents

Edit: Attunement Arena has since been renamed Attunement: Power of the Gods

A 3D Versus Elemental Brawler

Three Dimensional Math

The simplest math from the Orange Book (Realtime Collision Detection)

The simplest math from the Orange Book (Realtime Collision Detection)

In order to accomplish the gameplay goal here, I used Closest Point to Segment 3D math.

A step by step of the process is available here:

  1. This was accomplished by using a 3D problem simplified to 2 dimensions.
  2. For each segment of the air current, evaluate as follows.
  3. Evaluate the vectors for the start and end points of the line. We will call this line AB.
  4. Find the closest point on the AB line to the target. We will call this D.
  5. Evaluate the distance between the player and D. If this distance is greater than the player’s radius plus the radius of the current, we’re done.
  6. Evaluate the forces applied to the player and the input applied by the player. If either of these is too great, we want to stop so the player can leave or be knocked from a current.
  7. Create a vector that points along AB but points slightly towards the center of the current so the player can ‘settle in’ to enjoy the ride.
  8. If the player is at the start or end of the current, apply slightly different logic. Near A, behave normally. Near B, dont pull to the center of the current (or the end current can get frayed and fling you across it instead of behaving like a air spout)
  9. If the player is affected by the current, negate their current velocity and disable the effect of gravity upon them.
CODE: Air Current - Check Current Segment


The end result of the behavior is as follows:

An elementalist can enter a current from any point. If the player enters the current, they cease to fall and are ferried along the current from each segment to the next.

If a player inputs commands to their character to move, the force of the current is overridden allowing the player to fall or leave the current easily. Similarly, if the player is affected by any significant force (external forces are tracked and decay quickly), the current ceases to negate falling/current velocity, allowing the player to be thrown from the current.

The basis of this 3D math was provided by the amazing Orange Book: Realtime Collision Detection

Visual effect

This was done by using circular meshes emitted in the same direction.

Parts of the scripting set the particle velocity and lifetime based on the distance to the next node.

Game Implication

The gameplay implication of this is that it provides players a tool to quickly move around the game environment.

One of Attunement Arena’s design goals is to provide high degrees of player movement. A design problem that quickly emerges is the characters can move too fast for players to track what is going on.

A way to solve this issue is to reduce the base movement speed and to provide powerful and fast movement tools. The caveat is that the player won’t always be using the movement tools. This results in a contrast of movement speeds for the player, which make the faster movement feel more enjoyable. The additional benefit is that when a player is moving slower, they are a more vulnerable target allowing for depth of skill in the play-counterplay department.

Thank you for reading.


Post Edit: Check out more info on the Attunement: Power of the Gods blog.

Citation

Ericson, C. (2005). Realtime Collision Detection. San Francisco, CA: Elsevier.

Inclusive and Exclusive Strategies

This is a design post. It is mostly directed towards Trading Card Games (TCGs) but it does encompass other game with customizable player choice.

I’ll keep this simple and understandable for newcomers to those concepts. I’ll generalize some points for readability’s sake.

—-

In Magic the Gathering, there are 5 different colors, and cards can cost colored or colorless mana. For example, a card that costs 2G, costs 3 total mana, one of which must be green.

The cost is in the top right corner.

So in order to play cards, we need to play lands which produce mana.

If you compose your land base with Forest cards, you can produce plenty of Green mana.

Inclusive vs Exclusive

The concept of colors of mana is Weakly Exclusive. It discourages you playing multiple different strategies at once. If you play cards of all 5 colors, there is a chance you might not draw and have access to the necessary colors of mana.

Now imagine there was a land that produced two different colors of mana. It could allow you to more easily play two different colors, increasing the chance that your cards. This card is Weakly Inclusive. It encourages you to play multiple strategies at once.

The core balance between Inclusive and Exclusive strategies is part of what makes deck-building compelling. It encourages players to push the limits of exclusive strategies and try to greedily achieve as much ‘power’ as possible.

Weak vs Strong

Now to explore the terms Weakly and Strongly. I use these terms to describe how effective an individual example is at being Inclusive or Exclusive. The card Timber Gorge is not very strong and does not overpower the exclusive strategies of running individual colors.

Now I will shift to Hearthstone for further examples.

In Hearthstone, there are 9 classes, similar to Magic’s colors. Each class has it’s own class cards.

You cannot play class cards from other classes (generalization: I’m ignoring random effects).

The complete inability to play Fire Elemental in Paladin is Strongly Exclusive. There is no way to overcome that boundary, the strategic implications of the card Fire Elemental are completely disconnected from Uther (the Paladin)


To balance out the concept of class cards, Hearthstone also has Neutral cards, which can be used by any class. The existence of neutral cards is Strongly Inclusive. It encourages you to run individual cards or strategies in multiple decks.

An example of a powerful Neutral card is Dr. Boom. It is a powerful late game drop that can see play in practically every deck. The existence of Dr. Boom as a Strongly Inclusive card is degenerate.

Degenerate

There is no word to singularly describe what I want to use here. Degenerate is close: to diminish in quality, especially from a former state of coherence, balance, integrity, etc.:

The existence of Dr. Boom, as a Strongly Inclusive card, diminishes the quality of balance within the game. However, as a single instance, he has limited impact. Too many of these types of cards can devalue many strategies.

This is not a new occurrence within TCGs which I will come back to later.

Now let’s shift back to Magic the Gathering, to talk about Multicolor cards, the closest equivalent to if Hearthstone had class cards that were usable by multiple classes.

Remember how Magic uses 5 different colors. Some cards cost multiple colors of mana.


Compare Feral Krushok and Fusion Elemental. One requires a single colored mana, the other requires five different colored mana.

In Magic, multicolored cards are allotted a higher power level to compensate for the difficulty of acquiring multiple colors of mana. My example demonstrates this by Fusion Elemental’s 8/8 body compared to the 5/5 body.

Multicolor cards in Magic are both Inclusive and Exclusive. The reason they are both is that as powerful multicolor cards exist, they encourage players to branch out from individual strategies to create new ones. They are exclusive because it is difficult to combine these new multicolor strategies together.

However, Multicolor cards can become Purely Inclusive when multicolor mana becomes too achievable. It no longer becomes a cost to produce multiple colors but a requirement. This results in powerful multicolor cards degenerating the balance and power of mono-color cards.

MODERN

In Magic the Gathering, there exists different formats of play, which define the cards that are legal.

(Formats allows the developers to not require that every new card be comparable with every older card. This reduces the power creep that must happen over time to keep players interested in new products.)

Modern is a very broad format in Magic. It allows most cards printed in sets since Eighth Edition (2003-present day).

Magic the Gathering suffers from Over-Inclusivity in certain situations. Over-Inclusivity is where too many individual strategies can be combined at once, resulting in degeneration of previously healthy gameplay.

Over-Inclusivity happens in Magic the Gathering when multicolor mana becomes too achievable. There are many cards in modern that ease the challenge of producing multiple colors of mana. Many modern decks play 2-4 colors at relatively low cost. The result is degeneration in the number of potential strategies, combining rhe most powerful inclusive cards from multiple colors.

Inclusive: Anything that encourages combining strategies. Usually by lowering the cost of pursuing multiple strategies or giving cross strategy rewards. Inclusive cards are generally ‘value’ or ‘just plain good’

Exclusive: Anything that discourages combining strategies. Either by lowered chance of success, anti-synergy or lower resilience. Exclusive cards are generally ‘build around’ or ‘needs the right support cards’

Hearthstone Design Direction

Hearthstone has a solid design direction currently.

Many of the recent and upcoming cards are Strongly Exclusive.

Look at these following cards. Most of them encourage you to pursue a specific side strategy, which are generally incompatible with one another. This combined with the Strongly Exclusive class borders results in many different possible spaces to explore, while allowing for reasonable balancing.

To play Reno effectively, you often give up playing duplicate cards, weakening your ties to strategies that want duplicate cards.

Playing a deck full of 1-Attack minions is generally a downside, but Hobgoblin encourages it heavily, potentially giving you a large advantage. Note: Most powerful minions usually have more than 1 attack, excluding Hobgoblin’s strength from overpowering other decks.

In order for the ‘Holding a Dragon’ mechanic to be effective, you need a decent dragon density in your deck.

The ‘Holding a Dragon’ mechanic is especially well designed because it is Weakly Exclusive to aggressive decks. Aggro decks trend to have fewer cards in hand, thus have less chance of gaining the rewards for ‘Holding a Dragon.’

The new expansion Whispers of the Old Gods features Strong Exclusivity for cards like C’Thun. You can run cards that greatly benefit C’Thun, but don’t benefit other strategies. This encourages players to explore a semi-limited space that can be powerful without overpowering pre-existing strategies.

Flaws of Exclusivity

Exclusivity is great. It narrows the testing space which makes life easier for designers and developers. This makes balance and bug-fixing much easier.

There are downsides though. Here are a few:

  • Reduced possibility space means fewer options. Players might feel like there isn’t enough possibility space for them to explore.
  • Reduced possibility space means it will be tapped and expended sooner, resulting in potential boredum.
  • Too many or too powerful Inclusive cards heavily squelches potential decks – Dr. Boom, Tirion, and the Paladin class are great examples of this.
  • Cards that are too Strongly Exclusive can become Inclusive.
  • Archetypes that aren’t supportive enough lead to player disappointment (Hobgoblin & initial ‘Holding a Dragon’ instances)
  • Design can seem lazy to players. It can feel like the developers are forcing archetypes to exist if they are too exclusive.
  • Exclusive strategies need to be meaningfully different which requires a large possibility space in the original game.
  • It is challenging to thematically extend and support existing strategies without disrupting the tenuous balance.

Directions for the Future

It’s okay to force archetypes occasionally.

It’s okay to make Inclusive cards, but they should also demonstrate Exclusivity in other ways.

Fel Reaver is a great example of Inclusive Breeding Exclusivity. It’s Inclusive for an aggressive deck, but it creates Exclusivity as it costs you your ability to play the long game. This means that you can have a more powerful early game at the potential cost to your late game. The even better part of this card is how it encourages your opponent to make a dangerous decision of leaving the powerful Fel Reaver alive.

Another Inclusive Breeding Exclusivity card is Zombie Chow. It encourages late game decks to exist at the cost of weakening your early game capabilities. It has just enough impact on the game to prevent it from snowballing in either direction early on. It brings multiple strategies together while preventing itself from being run in other strategies.


These cards are best defined as strong but also introducing a weakness for using them.

—–

I hope you enjoyed reading this. I definitely enjoyed writing it.

If you’re interested in more, let me know through the contact form.


[contact-form-7 id=”1084″ title=”Inclusive/Exclusive Feedback”]


Train Jam Postmortem

ApodcalypseLogo

Train Jam 2016

Last week, I attended TrainJam, a rapid game development event where a bunch of talented people board a train from Chicago to California and make games before arriving.

The Schedule

Thursday morning: Get up and head to TrainJam. Meet the organizers and have early lunch with the other attendees. I sat at a table with nobody I knew and tried to learn a bit about everyone.
We learned about the process of TrainJam and the theme: ‘Maximum Capacity’. Everyone spent 20-30 minutes brainstorming ideas. Then came a frantic shouting pitching where you had 10-15 seconds to sell your idea if you had a good one.
Then we boarded. RIT was very generous in providing sleeper cars to the five RIT graduate students attending
I ended up with a team of two others – one student from UWisconsin & one programmer. We went to work.
Saturday at 3:20 PM: (Early) Arrival
Saturday at 4:00 PM: Intended arrival – minor celebration at the Amtrak Station.

Our Team

GIF

Our team was made up of three individuals.

Myself (@JPalmerGD): Programmer and Architect. I laid out the core structure for the project, wrote the simple AI for the pods, and setup scene transition.

Kalan Tix (@Kemblik): Artist and modeller. She modeled our escape pods, asteroids, debris. She illustrated our UI layouts, color palettes and logo.

Matthew Yaeger (@AmazingThew): Programmer and Unity novice. He wrote the pod control code and grappling hook. He tuned the gameplay feel and pacing.

Our Game – Apodcalypse

Apodcalypse Tutorial

ApodcalypseGameplay

Apodcalypse is a multiplayer physics survival game. Each player has a single escape pod they are trying to wade to the top of the screen through a mess of debris, AI pods and other players.

The game is available on Itch.IO and we’re pretty happy with what we got done.

Difficulties of working

  • The train rattled – hard to model, draw and use a mouse.
  • Hardly any internet – no reference docs. You know it or you don’t.
  • Limited table space – likely no table.
  • Difficult to sleep – I am thankful RIT provided a sleeper car. My teammates improvised.
  • Hygiene challenges – I did get a shower during the ride. The cars did start to smell a bit.
  • Limited food – Snacks started to run low towards the end. I came prepared.

Sunset


The Payoff

  • I met somewhere around 50-60 people out of the 200.
  • I rescued a couple people from terrible situations (with backup installers & other stuff).
  • I bumped into people from Vlambeer (Nuclear Throne/Ridiculous Fishing/Luftrausers), Camp Santo (Firewatch), MediaMolecule (Little Big Planet), Organ Trail, Intel, Epic, Unity, Xbox team, Indie artists, freelancers, Indie developers and more.
  • I now have a game to show at the EXPO floor which will lead me to meet more developers!

Lessons

  1. Take every chance to meet new people. Another grad chose to share his room with a random – ended up with the CEO of the Firewatch team.
  2. Names are important. Learning people’s names tells them you feel they’re important and they remember you. I greatly value learning names.
  3. Twitter. Plenty of devs use twitter. I now have a solid focus to meet and connect with other developers.
  4. Be prepared. I bailed out several people with my external hard drive. I had various installers, documentation and backup assets.
  5. Scope it down. We targeted a small game and got it together in time.
  6. Unity – Most devs were using Unity. Unreal and Lumberyard are just too difficult or unknown for this sort of jam setting (especially without internet documentation/stack overflow)

Regrets

Matthew was very new to Unity. I definitely think it made our end goals a bit harder. It was a great experience to be senior to someone else in terms of knowledge. Steering him towards techniques without explicitly sitting and teaching him step by step.

Not working with industry established individuals would’ve provided better networking and likely taught me some new tricks. I still enjoyed myself tremendously and learned much from the process.

I spent 3 hours solving a particularly nasty bug. This was a result of sleepiness, poor working conditions and hunger. This bug ended up stumping 3 other programmers before I managed to crack it. I don’t feel too bad about this.

In Closing

Train Jam was a fantastic experience I hope to repeat.

Challenging, engaging, and beautiful.

Sunrise


Rescue Reptiles – IndieCade Submission Postmortem

Rescue Reptiles Postmortem: The Road to IndieCade

Indiecade

IndieCade is a California located 3-day festival to exploring independent artists and highlight innovation & artistry within game development and interactive media.

Required submissions for a board game include a single copy of the game postmarked by the submission deadline as well as a gameplay trailer.

Rescue Reptiles

The Pitch

The weather has gone crazy after the 2012 apocalypse. Highly trained Rescue Reptiles serve as the last line of defense for rescuing children from turbulent weather. Each player controls a reptile in the frozen wasteland of Miami. Rescue 3 children first and your reptile is named Employee of the Month, winning a paid vacation to the warmest place on earth – Russia.
Reptiles harness wacky equipment and boosts to reach the children first while delaying others with traps and obstacles.

RR_SettingUp

Needed Prototype Components

  • 1 Game Board 18 inches x 18 inches
  • 16 Zone Tiles (~3 inches x ~3 inches)
  • 35 child game pieces
  • 6 player avatars
  • 100 Action Cards
  • 16 Zone Cards
  • Rules inserts
  • Game Box

Goal

The late deadline for submission was June 1st. I decided to submit Rescue Reptiles around May 17th or so, just after Finals week had ended.

This gave me just around 2 weeks to prototype, proof, and submit Rescue Reptiles to IndieCade 2015 for review.

Why Submit?

Rescue Reptiles has two major design successes: the modular Zone Tiles & the movable obstacle mechanics.

Zone Tiles

RR_BoardExample

The game board has 16 empty spaces where the 16 zone tiles are randomly placed & rotated. The players then moving across the game board and zone tiles.

The core design strengths of the zone tiles:

  • Improved replayability with random or crafted board layouts.
  • Provide a fair distribution of random locations for player starting locations and child appearances.

Action Cards

The Action Cards in Rescue Reptiles are divided into five distinct types:

  • Boost – Temporary self benefiting movement effects.
  • Trap – Temporary offensive effects played on opponents.
  • Obstacle – Single use repositioning of movable environment pieces.
  • Equipment – Lasting positive effects. Vulnerable to traps.
  • Strategy – Unique cards with powerful game changing effects.

The Obstacle cards have been universally well received. They are powerful, encourage thoughtful play but are balanced by the other types of cards.

Challenges

Trailer

A required part of an IndieCade submission is a trailer highlighting gameplay and general tutorial information. I didn’t learn this until dangerously close to the deadline.

This was the largest single challenge. I went through multiple iterations of planning, recording, and editing. Each time I was rebuffed and began over again. I finally settled on a time lapse featuring setup and basic play.

This is the trailer the game settled on:

This trailer still has problems in its final iteration.

  • It lacks explanation of the fine rules for what is an allowable obstacle placement
  • It doesn’t show how to handle Strategy, Traps and Equipment cards.
  • It speeds over the text giving too little time for the viewer to read without pausing and playing repeatedly.
  • It fails to explain the intended narrative and comedy of the game.

Construction

An earlier Rescue Reptiles prototype. The components are light and too easily moved.

An earlier Rescue Reptiles prototype. The components are light and too easily moved.

The overall construction of the components went well. It was time consuming to say the least. Much of this was caused by attempting to prototype with Foam Core, which was much harder to work with than framing mat. Using a mat cutter increased the rate at which I could cut out the tiles, board pieces, individual cards and rules inserts.

Another complication to this was learning that physical submissions for IndieCade are only required to submit one copy of the game. Initially, I was prototyping three different copies simultaneously. Despite the time cost of prototyping additional copies I would do it again, as the end version I submitted was of higher quality.

In addition to the game components, I provided rules inserts, which served to convey the game’s instructions. There were three large inserts which covered rules in greater depth. Two of these went onto opposite sides of one insert.

The rules inserts were an excellent touch. They had a strong tactile feel despite the lack of visual interest caused by no dedicated art.

The only disaster of the construction was the game board I submitted. It was a quad fold board but the paper taped to it didn’t fold well. In hindsight I wish I had submitted my earlier prototype card stock game board even though it lacked color.

Content Proofing

A major component of my submission was an included write-up of the instructions and specific rules. I managed to include the bulk of the instructional content without requiring the reading of a large booklet. I do regret not spending additional time creating diagrams and example layouts to help give players a more guided experience in the game.

Moving forward I need to provide more blind playtesting to evaluate how well players understand the rules I am currently providing. It was not feasible to include this in the given time frame.

Mistakes missed (and submitted)

Despite my attention to detail, few mistakes still made it through the cracks

  • The ‘s’ in the URL on every single insert
    • This was a massive mistake. Thankfully, my hosting auto-corrects the missing s to the correct website.
  • Benefitting was spelled wrong on the Action Cards Insert
  • Flavor text was missing punctuation
  • Falling Anvil Trap was Failling Anvil Trap
  • Colossal Punt’s effect text was ambiguous if it moved an obstacle to within 5 squares of your reptiles, or if it moved an obstacle within 5 squares to another location.

Costs

Costs of Submission

Submitting to IndieCade was decently expensive. Here is cost breakdown.

  • $110 Late submission fee (didn’t decide to submit till the last month)
  • ~$30 package mailing with return postage
  • $10.99 for 15 page of sticker paper
  • ~$8 for 10 more pages of sticker paper
  • ~$25 for 20×30 inches of foam core
  • $9 for 100 UltraPro green deck protectors
  • ~$6 for letter stickers to label the box
  • ~$12 for flat plastic storage box

Loose Total: $211 to submit Rescue Reptiles

Uncounted Costs

A number of the materials and supplies I had access to weren’t accounted for.

  • High quality mat cutter
  • Decent color printer with ink & paper
  • Mounted razor blade knife knife (similar to an Exacto)
  • Green duct tape for putting the board together (Estimated ~$5)
  • Packing tape for sealing the board (Estimated ~$5)
  • Large framing mat for game pieces in place of foam core (Estimated ~$9)
  • 16 White DragonShield sleeves (Normally ~$11 for 105, estimated $1.68)
  • ~30-50 hours of my personal time preparing the rules, components and proofing
  • ~10 hours worth of shooting, editing and trying to get a working trailer.

Lessons Learned

BULLET-POINT List

  • Trailers take time. Learning about needing a trailer last minute exacerbated this issue. A good trailer excites players and sells the game.
  • Physical prototyping turns out best when doing multiple iterations.
  • The lack of a quality game board was my weakest point.
    • Using TheGameCrafter for my upcoming game boards is a step in the right direction.
  • Including diagrams in the instructions could’ve helped if I had the time.
  • Art is critical.
    • Moving forward Rescue Reptiles needs art to deliver on the concepts and enhance the player experience.

Final Word

Submitting to IndieCade was a fantastic experience despite the various costs. Ultimately, it was more challenging and expensive due to my submission being such a late decision (after finals week had concluded.)

I would recommend it to others but plan further ahead of time.


I hope to update this postmortem when/if I receive feedback or acceptance into IndieCade 2015!

Thank you for reading!

Bun & Games – Bunny Heaven v1.06

BUNNY HEAVEN

Managed on Github

[Chrome Users: Webplayer support was recently removed from this browser. I am working to get a WebGL version for this project soon.]

[unity src=”935″]

There are two main controls: Movement (clicking or dragging) & Spacebark.

[You NEED Unity Webplayer to run this]

This image shows basic gameplay. Note the 60+ FPS & only 7 draw calls. Only one draw call is to display the bunnies.

This image shows ~500 animated bunnies. Note the 60+ FPS & only 7 draw calls. Only one draw call is to display the bunnies.

Let’s talk about Bunnies

About three weeks ago, I made a Bunny Heaven Dev Blog about a recent game jam project – Bunny Heaven.

It wasn’t much of a game. It had little interactivity. You could move a dog around chasing cute animated bunnies. The project’s merit is in how I misuse Unity’s default particle system to render 1000 adorable animated bunnies in one draw call.

Recently, work is renewing on this project! This blog post is a log of my thought process on how I utilize the particle system.

Bunny PArticles

From the bottom of Unity's Particle System inspector view.

From the bottom of Unity’s Particle System inspector view. (This image is slightly out of date.)

Unity’s default particle system allows for some limited animation options. You are limited to one material and forward playing animation at a constant rate.

This would simply not do. I had a very particular purpose in mind. I wanted to display a great quantity of bunnies to the screen at once. The most effective way to do this was to avoid GPU bottle-necking myself. Particle Systems typically involve very few draw calls as they let a single shader draw all the various particles.

This was the beginning of Bunny Particles.

From there, the bunnies needed to animate and move in different directions. I accomplished this with a technique I’m calling Epoch Locking

Epoch Locking

According to Google, an epoch is

the beginning of a distinctive period in the history of someone or something

In this instance, an epoch is the moment a particle is locked into in order for it to display an appropriate animation.

This is the origin of my term, Epoch Locking.

How to Epoch Lock

  1. Unity’s particle system animates linearly (according to the curve I have set in the image above).
  2. Unity’s particle system allows manual editing of individual particles.
  3. Unity’s manual particle access allows you to change the age of a particle.
  4. A material sprite sheet can contain frames of bunny animation, even different directions.
  5. By checking the direction particles are moving you can access the most appropriate animation to use. You can save the direction an individual particle is moving in a CPU side array.
  6. Finally, you can manually set the age of that particle to the appropriate time interval to display the animation appropriate for it’s current velocity.
    • If the age drops out of that appropriate epoch, you reset it to the beginning of that time period.
    • If the age is too young, you can set it to the beginning of the epoch.

An early mistake I made with my approach was using an incorrect size for the sprite sheet. It is ideal if the sprite sheet is pixel perfect, meaning that the pixels line up with the pixels of the sprite.

Additionally, I recommend about nailing down the formula appropriate for your epoch period calculation.

You’ll need both the min age and the max age for each individual particle based on how many times the animation will cycle and how many frames you will cycle it through. If the starting lifetime of a particle is high, and the particle cycles through the full animation sheet (even though we never let it), the animation will be faster. You will have to do math in order to achieve your preferred animation speed.

Finally, my current code:

BunnyParticleEpochLocking

If you want more rigorous look at how to Epoch Lock, check out Github – Bunny Heaven.

Modified Animation Rates

There is an unmentioned sub-topic within Epoch Locking here. What if we want different bunnies to animate at different rates?

For example, a bunny is quickly running away from the dog. It should animate more quickly than a bunny that is idly hopping along.

To accomplish this we need to adjust the remaining lifetime of particles each frame. We can modify their lifetime based on the magnitude of their velocity. When a particle is moving quickly, it will age more quickly. Faster aging means faster animation.

BunnyParticleAgeAdjustment

Not Quite an Idle Game

Bunny Heaven’s design is moving in the direction of an idle game.

In the most recent development, I added a point counter that will accrue as the player interacts with the game. The game will have no lose state and allow the player to purchase different ways to interact with the game. However, these new modes of play won’t give exponentially greater points, they will just allow the player more ways to have fun.

This portion will change depending on feedback, but the goal is a no-stress environment where you can interact at your leisure.

Closing Words

The most rewarding part of working on this has been handing my phone to people for them to say “This is stupid” and then proceed to play for another 3 minutes after they felt it wasn’t worth their time.

Forrest has expressed interest in publishing an early version of the game on the Google Play Store. The game would most likely be free and shareable.


Thank you for reading,

If you have any thoughts or comments, feel free to reach out!

Ataraxy – April 29th Build

April 29th Build V2.8

[Chrome Users: Webplayer support was recently removed from this browser. Due to this being an outdated build, I will focus on getting the up-to-date build working first.]

[unity src=”924″]

Use the full screen button ^

Submit Feedback
[contact-form-7 id=”789″ title=”Ataraxy Feedback!”]

Terrain Generation

This version introduces new life to the island generation. It improves my architecture for supporting more varied and interesting terrain.

Clusters

There are four types of cluster

  • Biome
    • Features floating islands of various materials randomly placed in one of three approaches
  • Rare
    • Hand-crafted islands with a theme or purpose in mind. In later versions, they will be far less common than normal biomes.
  • Boss
    • Will contain a powerful difficult enemy the player must overcome.
    • Denoted by a large red ‘warning’ zone around the cluster.
    • [Currently, no bosses are implemented.]
  • Landmark
    • Generated next to a normal biome cluster at an uncommon frequency.
    • Serve as visual anchors and to build visual interest.
    • [Currently there are only graybox landmarks.]

Island Generation

There are now three approaches for creating islands within a biome cluster.

  • Poisson Disk Sampling
    • The standard approach in previous versions.
  • Grid
    • A grid of islands with varying subdivisions & misalignment.
    • Creates simple horizontal battle areas.
  • Layered Poisson
    • Begins with standard Poisson approach and places duplicate islands above generated ones.
    • Increases vertical interest.

Cluster Inheritance

Clusters of islands now inherit attributes from their neighbors on generation.

  • Danger Level
    • Based on neighbors, influences how many encounters are within the cluster.
    • Higher danger level results in darker random materials.
  • Island Materials
    • Will not inherit materials from neighbors with harsh danger level differences.

UPCOMING DEVELOPMENT

  • Terrain Generation Improvements
    • Non-Graybox landmarks
    • Bridges?
    • Return of tilted platform?
    • More island generation approaches
  • Pathfinding bug fixes
  • Loot system revision
  • Bosses?

Thank you for reading and playing!

Unity WebPlayer Dead on Chrome: Moving Forward

Dear Unity Developers

If you did not know, the Unity WebPlayer plugin will no longer work by default for Chrome. Source

For better or worse, this change has happened and you can delve into why it happened elsewhere.

This post is about how you can get your content (portfolio pieces, projects, etc) back online.

This thread is about how you can get your portfolio pieces back and view-able on Chrome. If you’re old webplayers aren’t view-able on chrome, that can discourage people from testing your game or project out. We want to get that fixed.

RE-ENABLing NPAPI

It is possible to re-enable NPAPI (the old API that let the Unity Webplayer work on Chrome.)

You shouldn’t expect an end user to do this for obvious reasons: It requires your users to dig into hidden settings & enable things Chrome deliberately displays as dangerous and scary (because they are dangerous & scary.) Most users will immediately balk, leaving your content and possibly your webpage.

Take a look at the warnings at the top of the page where this option lies:

NPAPI

If you desire to re-enable this for your personal use, proceed as follows:

  1. Open Chrome
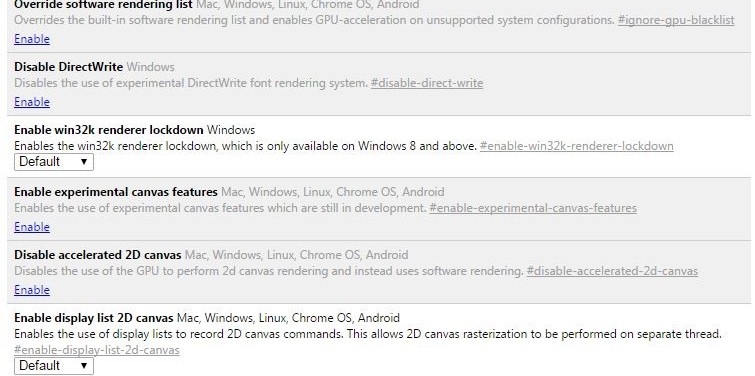
  2. Go to chrome://flags/
  3. Scroll & find ‘Enable NPAPI’

ZIP Distribution

A second plan of approach: a downloadable zip

This second option is still not ideal. Not everyone is willing to download a ZIP or RAR. Depending on the state of your website, chrome sometimes will go nuclear declaring malicious file warnings. You ultimately want to provide the path of least resistance to others if they are to test your game. Downloading takes time & trust that will dissuade some visitor.

To go about this approach:

  1. Set your Unity build settings to Mac or PC Standalone.
  2. Build your project.
  3. Zip your project up.
  4. Upload to Dropbox, Google Drive or distribute USBs by Carrier Pigeon.

WEBGL – The future?

A third option is to use Unity 5 & the new WebGL Preview build option.

In order to do this, you need to have Unity 5 installed. If you wish to continue using Unity 4 for development, you can maintain multiple installations of Unity on one computer. The downside is you will need to upgrade the project each time you want to build.

Upgrading Steps:

  1. Install Unity 5 (Unity Personal is free to most users)
  2. Backup your project or create a second project version.
  3. Upgrade your project to Unity 5.
  4. Pay attention to the upgrade progress for errors.
  5. Build to your previous project target
  6. Test your project.
  7. Fix any errors created from upgrading
  8. Prepare to build to the WebGL Preview target.

UPGRADE ISSUES

Upgrading older projects to Unity 5 comes with some small inconveniences in the form of upgrading errors or behavior changes.

I ran into several upgrading different projects but google turned up some easy answers. I’ll aim to keep this list updated with the non-project specific problems I find.

There might be some behavior changes within your project. Of the two projects I upgraded, I encountered some minor changes. Make sure to test your project!

BUILD SETTINGS

WebGLPreview

Once you get your project up and running with Unity 5, now comes the WebGL (Preview) steps.

  1. Select the ‘WebGL (Preview)’ option near the bottom of the Platform list.
  2. Click ‘Switch Platform’
  3. Click ‘Player Settings’ & confirm various typical settings
  4. Determine if you want a Development Build (read below)
  5. Determine what Optimization Level (read below)
  6. Click ‘Build’
  7. Select a target directory
  8. Click ‘Select Folder’
  9. Wait.
  10. Test your built WebGL version by opening the index.html in the target directory.
Development Build

If you plan on sharing your game, you don’t want to create a Development Build. It features non-minimized names & other inefficient approaches to allow for profiler use.

Optimization Level

Your choices here can be summed up like this:

The longer the build, the lower the file size and the lower the load times.

A small side project of mine (Cryomancer) went from 50MB to 30MB by going from Slow to Fast. (Disclaimer: I removed some unused audio, which Unity’s build pipeline should’ve stripped out anyway.)

I have yet to build Fastest (which apparently has the longest build times and should be done for final versions.)

User Faced File

If you’ve gotten this far, it means you have a built version or you’re waiting for it to finish.

I’ll take a moment to talk about the index.html. This index file can be modified and customized to contain things like game instructions, custom borders or even a link back to your website.

When you’re satisfied, hit build and pick a target directory!

You’ll get a different layout than the old WebPlayer html build page.

You will still have an ‘index.html’ that you can customize the contents for if you want to have stuff like game instructions, custom appearance or a link back to your website.

HOSTING

Finally, once you’re done you have a few options for hosting.

your webpage

You might be able to upload this straight to your website (maybe zip it locally, upload it and un-zip it there to speed things up).

This website is a custom wordpress install. I have yet to figure out how to directly embed WebGL Unity builds into posts or pages. If you know of a way or have advice, feel free to let me know.

DROPBOX

An alternative is hosting it on dropbox and providing a link on your webpage.

There is a great post on UnityAnswers that highlights how to do this.

An example link (which should be playable): Cryomancer WebGL on Dropbox

Finally, Facebook or other sites might put up warnings for this type of link, but that could be resolved as they get time to crawl the various pages.

Google Drive

For a Mini-Ludum a few months ago I managed to host a Unity Game on Dropbox. This was back in the days of WebPlayer, but it might be worth looking into.

If I get a chance to try this, I’ll update this post again.

CLOSING WORDS

I can’t speak for the WebGL build’s usability quite yet but it is online and I can link to it on my portfolio! I’ll aim to improve behaviors like full-screening, mouse locking & more in the coming weeks.

I hope that others find this useful.
If you have questions, comments or improvements to this process, feel free to reach out to me.

Ataraxy – April 7th Build

April 7th Build V2.6

[Chrome Users: Webplayer support was recently removed from this browser. Due to this being an outdated build, I will focus on getting the up-to-date build working first.]

[unity src=”877″]

Use the full screen button ^

Submit Feedback
[contact-form-7 id=”789″ title=”Ataraxy Feedback!”]

The past week and a half have been busy and chaotic.

Early Tutorial

Several iterations into the tutorial has provided a good basis for letting players experience the game.

Trying to introduce players to the individual elements of the greater game proves difficult.

This is a better current version as I move my focus back towards environment creation.

Incoming audio

As noted in a previous Dev Blog Post, I wrote an AudioManager for Alex Lobl to use when implementing audio. The AudioManager works as expected and soon the game will feature sound effects and music!

Modifier Fine Tuning

While not visible while playing, I fixed a number of bugs occurring behind the scenes with modifiers.

I tuned some numbers to give a better feel for pacing.

Finally, I provided myself editor controls to give specific enemies specific modifiers when hand crafting context. I used this extensively in the tutorial to have better control when teaching the game concepts.

UPCOMING DEVELOPMENT

  • Terrain Generation Improvements
    • Greater vertical interest
    • Bridges?
    • Return of tilted platforms?
    • Return of landmarks?
  • The all encompassing concept of Loot Orbs is going to be divided
    • Treasure Orbs – Gain a new item!
    • Healing Orbs – Keep yourself healthy!
    • Terrain Orbs – Creating more islands!
  • Treasure Orb tool tips to display which item they contain.
  • More Transmuter’s Kit alternate effects.
  •  Modifiers!
    • Non-numeric Modifiers are a consideration, gaining new weapons, movement patterns, attacks, etc.


Thank you for reading and playing!